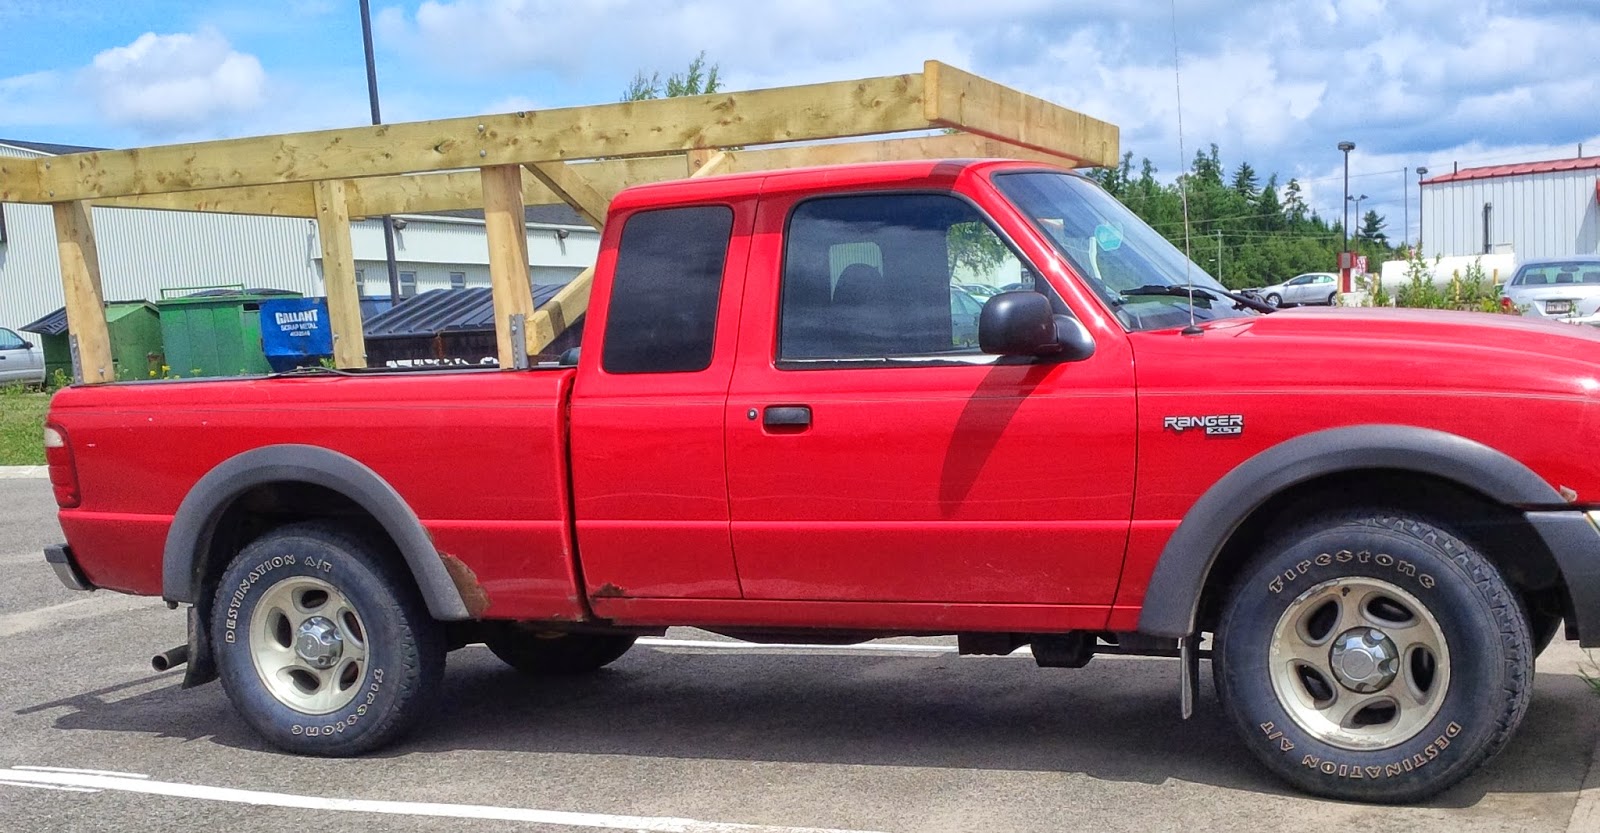
I have been using this design now for lugging a VERY heavy 18' Chestnut canoe and Kayak, and it is working extremely well and has met and exceeded all of my design requirements.
ALSO - I have an old truck with an old beat up bed liner, so a scratch or dent in my truck is of no concern if it is a concern for you - read a few of my after thoughts to help avoid any dings on your truck - I can't promise anything, as I have not designed with this issue in mind.
 |
| IMPORTANT - ensure that the width and height will fit your bed post holes |
Materials List:
Lumber
2 - 4x4x8 Pressure Treated
2 - 2x4x8 Pressure Treated
2 - 2x4x8 Pressure Treated
2 - 2x6x10 Pressure Treated
3 - 2x6x8 Pressure Treated
Hardware
8 - 3/8"x4" Hex Head Galvanized Bolts (and nuts)
28 - 3/8" Galvanized Washers
12 - 3/8"x5" Galvanized Carriage Bolts (and nuts)
8 - 3" decking Screws
40 - 1 1/4" wood screws
 |
| Make Sure these hangers can be screwed in both directions (some only have tap in metal tabs) |
Miscellaneous
2 - 2x6 Aluminium Joist Hangers
1 - 4' Pre-drilled Angle Iron
Tools List
Square
Measuring Tape
Hammer
Hand Saw
Hack Saw (or cutting grinder)
Rotary Saw (or table saw)
 |
| 3/8" X 5" Carriage Bolt (galvanized) |
Drill
Screwdriver Bits
Chisel
Ratchet Set
3/8" Drill Bit
3/4" Spade Bit
Metal file
First Aid Kit
 |
| 3/8" x 4" Hex Head Bolt (Galvanized) |
Instructions
Step #1 - Measuring
Measure, measure measure. Measure the post holes in your bed (mine were 1 1/2" x 2" - this is key when you go buy your angle iron, I was fortunate enough to find 1 1/2" x 1 1/2" pre drilled angle iron. Measure your canoe widths (if you are planning on carrying 2 - I landed on 76" wide, this is also the distance from to outside of my rear-view mirrors, so in tight places, if my mirrors wont touch, then my carrier wont either.
I have not done any research on the placement of post holes, bed widths, lengths and heights on other years of Ranger, so keep this in mind when you are using my measurements - it is worth a double check before you start cutting lumber,
Step #2 - Cutting Angle Iron
With a hacksaw or grinder, cut the angle iron into 4 - 1' pieces, file off the rough edges or get your first aid pack out to bandage up your cut hands. Test fit these in your post holes - you may have to do some filing, or grinding to make a good fit.
Step #3 - Cutting Posts
Cut the 4x4 posts into 4 pieces - 29" each (these are your carrier posts). Cut both the 2x6x8's down to 76" each (this is the width, or cross members of the carrier and you may want a different width, cut accordingly)
Step #4 - Attaching Rear Post to Carrier
On the end of the 2x6X10 mark a line across the width 1 3/4' in from the butt. From each edge mark a short line (across the line you just marked) 1 1/4" in. These two "X"s are your drill holes to mount to your rear post. I suggest (unless you have a drill press) to position the rear post under the 2x6X10 you just marked and a alight it carefully - use a square. As you only get one chance on this - double check square and alignment before you drill. With a 3/8" bit drill BOTH HOLES on your "X" marks through both the 2x6x10 and the 4x4 post. I expect your drill is not long enough to get all the way through, so after drilling as far as possible, lift up the 2x6x10 and drill the rest of the way through both holes the 4x4. Stop Drilling when the wood shavings turn to concrete - you are now drilling a hole in your driveway.
On the rear of the 4x4, where the drill hole came through, with a 3/4" bit, drill a countersink hole approx 1/4" deep.
Take 2 Carriage bolts and connect the 2x6x10 and the 4x4. Add as washer and bolt in the countersunk hole and tighten. Do not do final tightening until the angle is confirmed at 90 degrees, and alignment to edges and butt suit your fancy - otherwise, get in your truck and go buy more lumber and try again.

Step #5 - Attaching Front Post to Carrier
 Measure the distance from the farthest two edges of your post holes along one side of your cab. So the edge of the hole closest to the tailgate and the edge of the hole that is closest to the cab. (Mine is 65 1/2")On your 2x6x10 that you have just attached the rear post, measure from the butt of that board to the distance you measured from your truck bed post holes. With a square, draw a line across the board at that mark. (this is the edge to edge distance that your posts will be.
Measure and mark a straight edge 1 3/4" from that line toward the end of the board that has the post already installed. (this will mark the centreline of the 4x4 forward post) as following the same drilling and countersinking process as STEP #4). Again, as STEP #4 bolt the forward post to the 2X6X10.
Step #6 - Notching the Front Lap Joint
 At the front end of the 2X6X10, with a square, measure a line 1 1/2" from the end. From the end of the board, down the center (2 3/4") to intersect with the perpendicular line that you just marked. With a handsaw, cut the top notch out of the end of the board. ENSURE that you are cutting the notch out of (what will be) the TOP if the carrier.
Step #7 - Mounting the First Side
With the angle iron placed in the post holes, place the newly constructed side to align the 4x4 posts into the corner of the angle iron. Make sure the posts are resting on the edge of the truck bed, and that the angle iron is firmly fitted to the 4x4s. With a 3/8" drill, select a hole on the side of the angle iron, and back of the angle iron and drill a hole through the angle iron holes, through the 4x4. Insert a 4" 3/8 Hex Bold through these holes and affix with a washer and nut. Repeat the process with the forward post. You will have to remove the assembled piece off the truck to drill the rear hole in the front post as the truck cab will no allow space to drill.


Step #8 - Building and Mounting the Second Side
Repeat STEP 4 through STEP 7 for the other side of the truck bed. Lay the pieces out before any drilling to ensure that you are placing the 4x4's on the correct side of the 2x6x10.
Step #9 - Attaching Rear Cross Member
Measure outside distance from the outer edges of the 2 rear posts (mine was 58 1/2") inches. Take the width of your rear crossmember (mine being 76" - cut in Step #2). Subtract the outer measurement from the crossmember measurement and divide by 2, then add 1 3/4".
Example
76" - 58 1/2" = 17 1/2"
17 1/2" divided by 2 = 8 3/4"
8 3/4" + 1 3/4" = 10 1/2"
WHAT THE HELL IS THIS??? Well, this will be the center marks for the required drilling location to mount the rear cross member centered.
From each end of your cross member, with a square, mark this calculated measurement (10 1/2" in my case) line across the cross member. Next mark a tick 2 " in from each edge along these 2 lines. where these lines intersect drill a 3/8" hole (2 one either end of the cross member).
Using the line marked on each end of the crossmember (with some help) hold the cross member in place connecting the top of the 2 rear posts. Line the marks you made on the crossmember with the CENTER of the 4X4 posts. You may need to apply some pressure on the posts to get these to align, as the sides may not yet be square. With everything square and plumb, insert your 3/8" drill into the holes you just drilled in the cross member, drilling through the 4X4 posts.
At the rear of the posts, with a 3/4" Spade bit, drill countersink holes as done previous.
Insert the 4 Carriage Bolts, with washers and nuts and tighten.

 More Math!! To mark where the cut-outs for the front lap joint it is similar to Step 9, so I hope you wrote down all your measurements.
Step #10 - Cutting Lap Joint on Front Crossmember
More Math!! To mark where the cut-outs for the front lap joint it is similar to Step 9, so I hope you wrote down all your measurements.
Overall length of crossmember MINUS post outer distance from step #9 (again mine is 58 1/2"), divided by 2.
Example:
76" - 58 1/2" = 17 1/2"
17 1/2" divided by 2 = 8 3/4"
From each end of of the crossmember draw a line with your square this measurement in (8 3/4"). From EACH of the lines, measure in (towards the center) 1 1/2" and draw another square line.
From the edge of the board, mark a line lengthways 2 3/4". This should now have 2 notches marked with dimensions of 1 1/2" W x 2 3/4"D.
With a handsaw, cut the notches to meet the 2 3/4" line, at both ends. With a hammer and chisel, and some care and caution, chisel out the notch.
Step #11 - Mounting Front Crossmember
 Almost done, As per the illustration, this is a simple step. Screw the joist hangers ( with 1 1/4" wood screws) on the ends of the 2X6X10 side members, taking time to ensure that they are aligned to meet the crossmember.
IMPORTANT - These are to be mounted upside down to their traditional use - this is designed to help support the load on front crossmember.
Slide the front crossmembers into the notched side members. They may need a bit more chisle work to ensure a good fit - DON'T wail on these joints with a sledge hammer to make them fit - split wood would be a major setback at this point.
Step #12 - Cross Supports
I have racked my brain on how to detail the cutting and construction of these - but, for me was a lot of test fitting, adjusting angles, and a few thrown hammers and saws. So I hope that the photograph offers a good amount of direction for you. So my apologies for no measurements or angles detailed below. But here is a brief detail of the trail and error I followed.

The good news is that once you have cut the angles to fit exactly how you want one crossmember to fit - the other crossmember is IDENTICAL, and you can use that one as a template for cutting the second one.
After you have both pieces cut, Tack the two in place - one will fit perfectly, the other (until you notch out the center joint) will have to be tacked as best as possible in place.
When they are both in place, with a sharp pencil, mark on BOTH 2X4s where they intersect.. you will need these to notch BOTH out for final installation.
Set the cutting blade depth on your rotary saw or table saw to EXACTLY 3/4". Follow the lines that you marked on the 2X4, this will cut though exactly 1/2 of the width of the 2X4. Hopefully by know you see what I am getting at - by cutting both of the 2/4's along your marked lines, you will see how they will fit together. I cut many lines between the 2 edge lines to simplify chiselling out the notched out areas.
YES - this is a crappy way to explain this step - but one could write a book on this joint alone.
Step #13 - Installing Cross Supports
 FINAL step, and maybe the easiest. With 3" deck screws, attached the crossmembers in front of the 2 front 4x4 posts. The bottom attachments will need to be screwed in at an angle as the cab of the truck is in the way -or if you have help, you can remove the rack from your truck to add these screws.
Where the joint is at the crossover of the 2 supports - use 1 1/4" wood screws to connect the 2 braces - and do a neater job than I did (see photo of step #12)
Optional Steps
There are a few things that I considered in this design, but at this time decided to pass.
1. Protecting my paint job - It may be worth a try to cover the angle iron with rubber (possibly a section of bicycle tire tube) to reduced the potential of scratching your truck bed post holes.
2. Additional crossmember - as my purpose is to carry a 18' canoe, the 10' span between cross members is fine. But, you may want to consider a 2x4 crossmember just in front of the "X" bracing. Using 2x4 joist hangers would provide a simple mounting and strength solution
3. Keeping the rack from blowing off... I am still considering cutting 4 short pieces of light chain, and attaching quick latches on one end and the other end to the bolt on the angle iron. These 4 short chains could be attached to the tie down mounts in the inner corners of the truck bed.
I look forward to any comments, improvements or questions.
Looks great. I wonder if you could add a block to the front crossbeam to help with lifting your Tanzer mast?
ReplyDeleteAndrew - that is a great idea! - I am also pondering a roller for my rear crossbeam to allow single handed loading of the chestnut. And by the way this rack almost was a part of my most recent mast lowering of the Tanzer - but not planned LOL
Delete